
[HPC From Scratch] Episode 3: The WiFi Login Node
Published:
A laptop, a home router, and a gigabit switch. One isolated cluster subnet.
Welcome back to HPC From Scratch. In Episode 2, we upgraded the four M715q nodes with dual-channel RAM and an NVMe drive, and fixed the iGPU memory trap that can crash Slurm jobs. This episode brings the cluster online: installing Rocky Linux, designing the network, and turning a laptop into a DHCP server, NAT gateway, and SSH bastion for the internal cluster subnet.
(Click the image to watch the tutorial on YouTube)
Table of Contents
- 1. The Topology Decision
- 2. OS Installation
- 3. Login Node on WiFi
- 4. DHCP: Handing Out IPs
- 5. NAT: Getting Workers to the Internet
- 6. Hostnames Instead of IPs
- 7. Hardening the Exposed Surface
- 8. Why WiFi Is Not the Bottleneck
- 9. What is Next
> 1. The Topology Decision
In production HPC, management and compute networks are strictly wired, physically separated, and connected through managed switches with VLANs. A single enterprise managed switch can cost more than this entire cluster.
For a home build, there are two realistic paths:
- Flat home network. Plug every node into the home router. Easy, but every node is exposed to the same network as phones, TVs, and IoT devices. No isolation, and one compromised device can reach the whole cluster.
- Physical isolation with a dedicated switch. All cluster nodes live on their own subnet behind a cheap unmanaged switch. The login node bridges the two worlds.
I went with option 2. The Netgear GS308E provides the isolation. The login node sits at the boundary, handling DHCP, DNS, and NAT for the internal cluster subnet. Worker nodes never see the home network directly.

The result is the same pattern used in production HPC: the login node at the edge, an internal fabric behind it, and no direct external exposure for compute nodes. The difference is scale. Gigabit Ethernet instead of InfiniBand. An unmanaged consumer switch instead of a spine-leaf topology. Same architecture, different order of magnitude.
Note: The HP Envy GPU node (
corsair-01) connects to the same switch and gets the same base OS and network setup as every other node. The GPU side of that box will be configured in a later episode.
> 2. OS Installation
Every node runs Rocky Linux 9, minimal install. I used the NanoKVM to mount the ISO and drive the installer over my browser, rotating it between machines. A monitor and keyboard work the same way if you do not have a NanoKVM.
The installation itself is unremarkable: boot the ISO, select minimal install, pick the boot drive, let it run, reboot.
Two things worth pre-planning while installing:
Create a sudoer user on every node. This is the account you will SSH into later. Root SSH will be disabled, so without this account you will lock yourself out.
Use the same username across all nodes. When you run ssh-copy-id later, the local username is assumed by default, so ssh-copy-id arbiter works if the user matches on both sides. When FreeIPA comes in a later episode, it will replace these local accounts with centralized identity, but consistency makes the transition smoother.
> 3. Login Node on WiFi
The login node is carrier, a refurbished Lenovo IdeaPad 1 laptop. It has WiFi and one Ethernet port. Most build guides would tell you that a login node should be wired. I put this one on WiFi on purpose.
Why WiFi for the external side? The login node needs internet access for package updates, pulling datasets, and remote SSH from outside the home. Running Ethernet to the home router would work, but it would consume one of the eight switch ports I need for cluster nodes, and it would require an extra cable across the room. WiFi removes that constraint at the cost of bandwidth the login node does not actually need.
Why Ethernet for the internal side? All heavy traffic (NFS reads, MPI messages, scheduler heartbeats) has to stay on the wired switch at full gigabit. The login node’s Ethernet port is the gateway into that fabric.
There are three laptop-specific steps to cover before anything else works.
Essential packages. Throughout the series we will need a compiler, git, and a reasonable editor:
sudo dnf upgrade -y
sudo dnf install -y epel-release
sudo dnf install -y vim git wget tree curl gcc-c++ cmake m4
Lid-close fix. By default, closing a laptop lid triggers systemd-logind to suspend the machine. For a login node this is catastrophic: the cluster loses its DHCP server, NAT gateway, and SSH entry point the moment you close the lid. The fix is a one-line change in /usr/lib/systemd/logind.conf:
HandleLidSwitch=ignore
After sudo systemctl restart systemd-logind, the laptop can live closed on top of the cluster stack without suspending.
Routing priority. With two active interfaces (WiFi and Ethernet), Linux has to decide which one handles outbound internet traffic. It picks based on the route metric: lower metric wins. By default the wired connection often gets a lower metric than WiFi, which means internet traffic would be routed out through the cluster switch, which has no path to the home router. The fix is to force WiFi to have the lowest metric:
nmcli connection modify <WIFI NAME> ipv4.route-metric 10
nmcli connection down <WIFI NAME> && nmcli connection up <WIFI NAME>
Find the connection name with nmcli connection show. After this, ip route show default should list WiFi as the first (primary) default route.
> 4. DHCP: Handing Out IPs
The worker nodes need IP addresses. They have no connection to the home router, so the home router’s DHCP cannot reach them. The login node has to become their DHCP server.
First, give the login node a fixed address on the cluster side. Workers will use this as their gateway:
nmcli connection modify <WIRED NAME> ipv4.addresses 192.168.50.1/24 ipv4.method manual
nmcli connection up <WIRED NAME>
Now install and configure dnsmasq. I picked it over isc-dhcp-server because it is lightweight, single-binary, and handles both DHCP and DNS. For a six-node cluster, anything more is overkill.
sudo dnf install -y dnsmasq
sudo mv /etc/dnsmasq.conf /etc/dnsmasq.conf.bak
The replacement /etc/dnsmasq.conf is about ten lines:
interface=<WIRED INTERFACE>
dhcp-range=192.168.50.10,192.168.50.50,12h
dhcp-option=3,192.168.50.1
dhcp-option=6,1.1.1.1,8.8.8.8
log-queries
log-dhcp
Find the interface name with nmcli device. Each line does one job:
interface=restricts dnsmasq to the wired side only. Without this, dnsmasq would try to answer DHCP requests on WiFi too, which would fight with the home router.dhcp-range=defines the pool of IPs dnsmasq will hand out, and the lease duration (12 hours).dhcp-option=3,192.168.50.1advertises the login node as the default gateway. This is how workers learn where to send traffic destined for the internet.dhcp-option=6,1.1.1.1,8.8.8.8tells workers which DNS servers to use (Cloudflare and Google as public fallbacks).log-queriesandlog-dhcpturn on verbose logging. Invaluable during initial bring-up. Turn them off once the cluster is stable.
Open the firewall for DHCP and DNS, then start the service:
sudo firewall-cmd --permanent --add-service=dhcp
sudo firewall-cmd --permanent --add-service=dns
sudo firewall-cmd --reload
sudo systemctl enable --now dnsmasq
Tip:
journalctl -u dnsmasq -fon the login node during worker boot shows the full DHCP handshake as it happens (DHCPDISCOVER,DHCPOFFER,DHCPREQUEST,DHCPACK). Very useful for diagnosing why a worker is not getting an address.
> 5. NAT: Getting Workers to the Internet
DHCP handed out IPs in the 192.168.50.x range. Those are private addresses, defined by RFC 1918 as non-routable on the public internet. If a worker sends a packet to dnf.rocky.example.com, it goes out to the cluster switch, bounces around, and dies. It has no path out.
The fix is Network Address Translation (NAT). The login node rewrites the source address on every outbound packet to its own WiFi-side public IP. Reply packets come back to the WiFi IP, and the login node looks up which internal source the packet belongs to and forwards it back. This is the same trick your home router does for every device in the house.
Two pieces are needed.
IP forwarding. By default, a Linux machine will not forward packets between interfaces. It has to be explicitly allowed:
sudo sysctl -w net.ipv4.ip_forward=1
echo "net.ipv4.ip_forward = 1" | sudo tee /etc/sysctl.d/99-ipforward.conf
The first command enables forwarding immediately. The second persists it across reboots.
Masquerade rule. With forwarding enabled, the kernel will route packets between interfaces, but it will not rewrite their source addresses. A masquerade rule on firewalld tells the kernel to do that rewriting:
sudo firewall-cmd --permanent --add-masquerade
sudo firewall-cmd --reload
Verify:
sudo firewall-cmd --list-all | grep masquerade
Should show masquerade: yes.
Bring workers online and test. Power on a worker node. On the login node, check the leases file:
cat /var/lib/dnsmasq/dnsmasq.leases
Each line contains a timestamp, MAC address, IP, and hostname. SSH into the worker using the sudoer account you created during install:
ssh <user>@192.168.50.11
ping -c 3 1.1.1.1
If the ping works, every piece (DHCP, routing, NAT, DNS) is doing its job.
> 6. Hostnames Instead of IPs
Typing IP addresses everywhere gets old fast. Worse, if you ever renumber the subnet, every script, config file, and commit history has the wrong addresses baked in. Hostnames are indirection, and indirection is cheap insurance.
I use these names:
| Hostname | IP | Role |
|---|---|---|
carrier |
192.168.50.1 | Login node |
arbiter |
192.168.50.50 | Management / NFS |
interceptor-01 |
192.168.50.15 | Compute |
interceptor-02 |
192.168.50.32 | Compute |
observer |
192.168.50.19 | Visualization |
corsair-01 |
192.168.50.11 | GPU |
On each node, including the login node:
sudo hostnamectl set-hostname <HOSTNAME>
Then add every node to /etc/hosts on the login node:
192.168.50.1    carrier
192.168.50.50   arbiter
192.168.50.15   interceptor-01
192.168.50.32   interceptor-02
192.168.50.19   observer
192.168.50.11   corsair-01
From now on ssh arbiter works instead of ssh 192.168.50.50. This is a stopgap. FreeIPA in a later episode brings up a proper DNS server so hostnames resolve cluster-wide without touching /etc/hosts on each node.
> 7. Hardening the Exposed Surface
Only the login node is reachable from the home WiFi. Workers sit behind NAT on their own subnet, so nothing on the home network can reach them directly. Hardening effort goes into carrier.
Three things matter here: the SSH config itself, brute-force protection, and a small systemd fix specific to laptops.
SSH drop-in config. Rocky 9’s default /etc/ssh/sshd_config includes files from /etc/ssh/sshd_config.d/*.conf, and the first value wins when the same setting appears in multiple files. This is a drop-in config system: you do not edit the main config, you add a new file with only the things you want to change.
The only real change I make is disabling direct root SSH login:
sudo tee /etc/ssh/sshd_config.d/99-custom.conf > /dev/null <<'EOF'
PermitRootLogin no
EOF

sudo sshd -t              # validate syntax
sudo systemctl reload sshd
A few settings stay at their upstream defaults on purpose:
- Public key authentication is enabled by default.
ssh-copy-idworks without any config change. - Password authentication is also enabled by default, and I keep it. HPC users coming from university clusters are used to password login, and FreeIPA in a later episode will route that through centralized auth anyway. The combination of
fail2banand a decent password policy is a reasonable defense. - Host keys (the server’s identity, not user keys) auto-load when no explicit
HostKeydirective is set. Rocky 9 generates RSA, ECDSA, and Ed25519 host keys at first boot. No config needed.
Make sure the SSH port is reachable through firewalld:
sudo firewall-cmd --permanent --add-service=ssh
sudo firewall-cmd --reload
fail2ban. Port 22 attracts brute-force attempts even on home networks. A compromised IoT device on the same WiFi is enough to start one. fail2ban watches auth logs, and when it sees too many failures from the same IP in a short window, it adds a temporary firewall rule to drop traffic from that IP.
Following upstream fail2ban guidance, the configuration is a short jail.local that overrides only what I want to change:
sudo dnf install -y fail2ban

sudo tee /etc/fail2ban/jail.local > /dev/null <<'EOF'
[DEFAULT]
bantime = 10m
maxretry = 3

[sshd]
enabled = true
mode = aggressive
EOF

sudo systemctl enable --now fail2ban
Three failed auth attempts from an IP and it is banned for ten minutes at the firewall level. mode = aggressive combines the normal, ddos, and extra SSH filters. normal catches standard auth failures, ddos catches connections that close before authentication completes (a signature of some scanners), and extra adds a few less common patterns. Check what is currently banned with sudo fail2ban-client status sshd.
Cluster-wide passwordless SSH. With key auth enabled and the SSH jail in place, the last piece is distributing keys. On the login node, as your regular sudoer user (not root, which cannot SSH anyway):
ssh-keygen -t ed25519
ssh-copy-id <user>@arbiter
ssh-keygen creates a private/public keypair in ~/.ssh/ (id_ed25519 and id_ed25519.pub). ssh-copy-id logs into the target machine with password auth once, then appends your public key to ~/.ssh/authorized_keys on that machine. On subsequent SSH attempts, the server sees your public key, verifies you have the matching private key, and lets you in without asking for a password. Repeat for each worker. After that, ssh arbiter from the login node should not prompt for a password.
Optional: sshd startup override for laptop login nodes. On this laptop-based login node I ran into occasional boot-time issues where sshd failed to start before the Ethernet interface was fully configured. I did not capture the exact error at the time, so I cannot confirm the root cause with certainty. The standard fix is a systemd override that makes sshd wait for network-online.target and retry on failure. If your sshd is in a failed state after reboot, check journalctl -u sshd -b. If you are building this on desktop or server hardware, you likely do not need it.
Apply it with sudo systemctl edit sshd.service and paste:
[Unit]
Wants=network-online.target
After=network-online.target

[Service]
Restart=on-failure
RestartSec=5s
StartLimitIntervalSec=0
systemctl edit creates the drop-in file at /etc/systemd/system/sshd.service.d/override.conf and runs daemon-reload automatically.
> 8. Why WiFi Is Not the Bottleneck
The most common question about this topology is whether WiFi on the login node bottlenecks the cluster. It does not, because traffic paths are asymmetric.
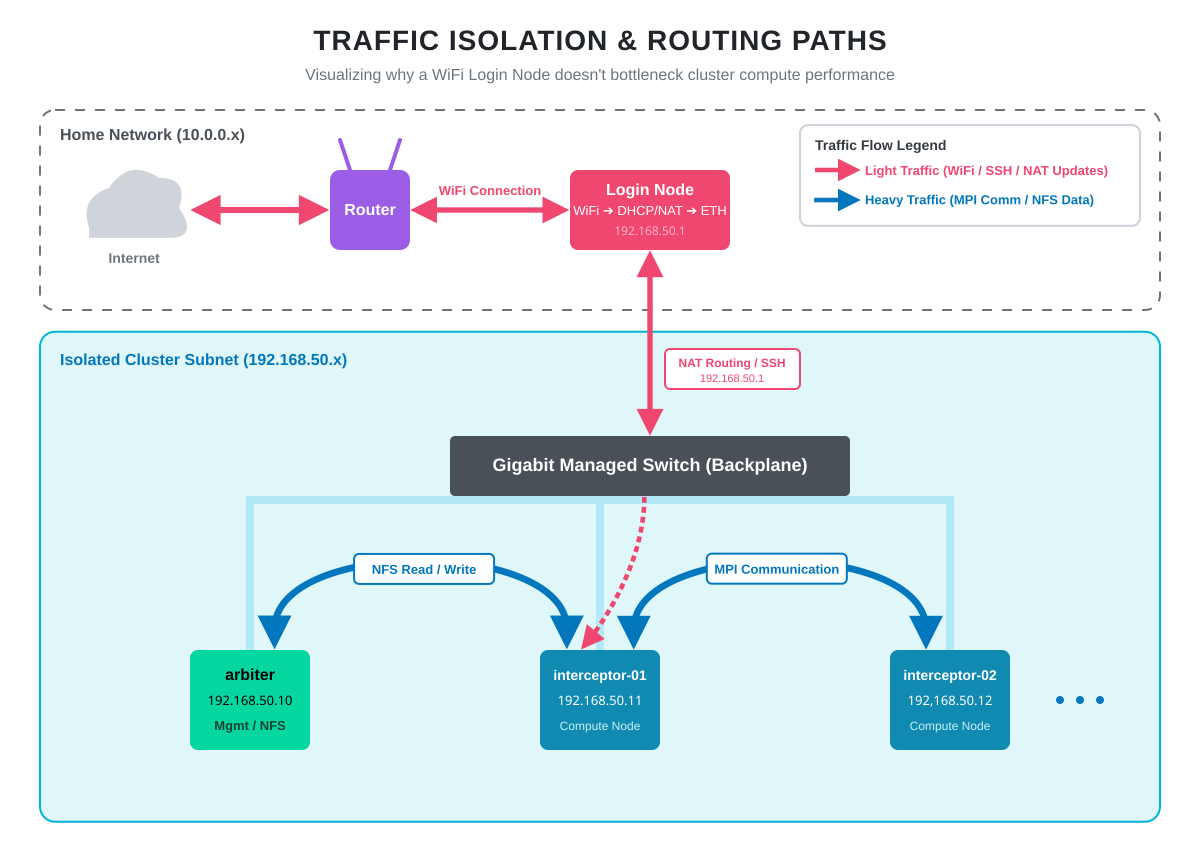
Editing code over SSH, pulling packages from dnf, running git pull, monitoring the system from a browser: all of this goes out over WiFi. None of it is bandwidth-sensitive. WiFi throughput at a few hundred Mbps is more than enough.
The heavy lifting happens entirely on the gigabit switch. When interceptor-01 reads a dataset from arbiter’s NFS share, that traffic goes node-to-switch-to-node without ever touching the login node. When an MPI job on two workers exchanges messages, same thing. Full gigabit, predictable latency, no WiFi involvement.
The compute fabric is purely wired. The WiFi side is only for management and internet access. Someone streaming 4K video on the home network has zero impact on cluster performance.
> 9. What is Next
The cluster is now networked, addressable, and reachable. Every node has an OS. Hostnames resolve. The login node handles DHCP, NAT, and SSH for the internal subnet. From any machine on the home network, I can SSH into carrier and from there into any worker, password-free.
In Episode 4, we mount the Samsung 990 Pro on arbiter as shared NFS storage and bring up FreeIPA for centralized user management. After that, a single user account created once will work across every node in the cluster, and all nodes will share a home directory tree.
All configuration files and the full command reference for this episode are on GitHub.
Happy Computing!